Post
Smartphone Photography Tips: How to Shoot Like a Professional
Jun
Smartphone Photography Tips: How to Shoot Like a Professional
Introduction
Smartphone cameras have evolved into powerful imaging systems capable of producing stunning photos that rival many dedicated cameras. Thanks to larger image sensors, advanced computational photography, artificial intelligence (AI), optical image stabilization (OIS), and multiple camera lenses, modern smartphones can capture breathtaking landscapes, portraits, night scenes, and videos with remarkable quality.
However, owning a premium smartphone doesn’t automatically guarantee professional-looking photos. Great photography depends on understanding light, composition, camera settings, and shooting techniques—not just camera specifications.
Whether you’re creating content for social media, documenting your travels, capturing family memories, or building a photography portfolio, this guide will help you maximize your smartphone camera’s potential and shoot like a professional.
Learn more about smartphone photography features and camera technologies at:
Why Smartphone Photography Has Become So Powerful


Today’s flagship smartphones combine sophisticated hardware with intelligent software processing.
Modern camera systems often include:
- High-resolution sensors
- Ultra-wide-angle lenses
- Telephoto zoom lenses
- Optical Image Stabilization (OIS)
- AI scene recognition
- HDR photography
- Night mode
- RAW image capture
Together, these technologies make it easier than ever to produce high-quality images.
1. Clean Your Camera Lens First
This simple step is often overlooked.
Your phone spends most of its time in your pocket or bag, allowing dust, fingerprints, and smudges to accumulate on the camera lens.
Before Every Shoot
Use:
- A microfiber cloth
- A clean soft fabric
Avoid rough materials that could scratch the lens.
A clean lens instantly improves sharpness, contrast, and image clarity.
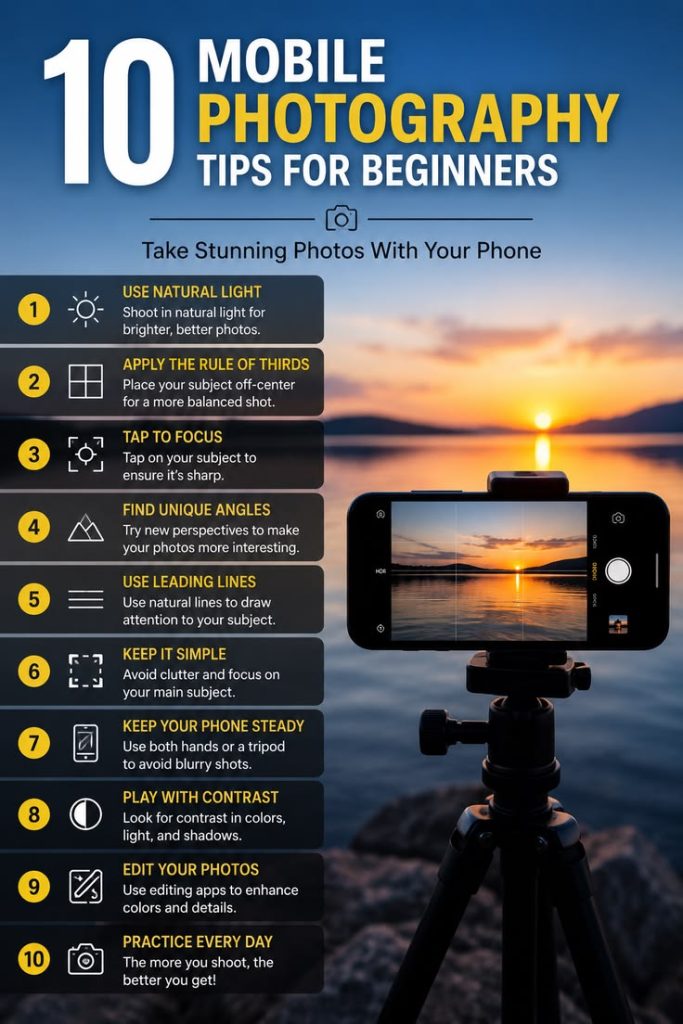
2. Understand Light
Lighting is the single most important factor in photography.
Best Lighting Conditions
- Golden hour (shortly after sunrise or before sunset)
- Soft window light
- Bright overcast days
Avoid
- Harsh midday sunlight
- Mixed indoor lighting
- Strong backlighting unless intentional
Professional photographers often prioritize lighting over expensive equipment.
3. Use the Rule of Thirds


Composition greatly influences how a photo feels.
Most smartphones allow you to enable grid lines in the camera settings.
Imagine the frame divided into nine equal sections.
Position important subjects along the grid lines or at their intersections to create balanced and visually engaging images.
4. Tap to Focus and Adjust Exposure
Automatic focus isn’t always perfect.
Before taking a photo:
- Tap your main subject to focus.
- Adjust exposure using the on-screen brightness slider if available.
This helps ensure your subject is sharp and properly exposed.
5. Use Natural Depth Instead of Digital Zoom
Many people rely heavily on digital zoom.
However, digital zoom often reduces image quality.
Better Alternatives
- Move closer to your subject.
- Use the phone’s dedicated telephoto lens if available.
Optical zoom maintains much better detail than digital enlargement.
6. Keep Your Phone Stable


Camera shake is one of the main causes of blurry photos.
Improve Stability By
- Holding the phone with both hands
- Keeping elbows close to your body
- Leaning against a stable surface
- Using a tripod for long exposures
For night photography, stability becomes especially important.
7. Learn When to Use Different Lenses
Modern smartphones often include multiple cameras.
Ultra-Wide Lens
Best for:
- Landscapes
- Architecture
- Interiors
Main Camera
Ideal for:
- Everyday photography
- Portraits
- Street photography
Telephoto Lens
Perfect for:
- Portraits
- Wildlife
- Distant subjects
Choosing the right lens improves image quality and perspective.
8. Shoot During Golden Hour
Golden hour is one of photographers’ favorite times to shoot.
Benefits include:
- Warm colors
- Soft shadows
- Beautiful skin tones
- Pleasant contrast
Golden hour often produces cinematic-looking images with minimal editing.
9. Use Portrait Mode Correctly
Portrait mode creates background blur that mimics larger cameras.
For the best results:
- Keep appropriate distance from your subject.
- Ensure good lighting.
- Choose uncluttered backgrounds.
Portrait mode works particularly well for people and pets.
10. Experiment with Different Angles
Avoid taking every photo from eye level.
Try shooting:
- From low angles
- From above
- Through objects
- Using reflections
Changing perspective often makes ordinary scenes appear more interesting.
11. Don’t Overuse Filters
Heavy filters can reduce the natural appearance of a photo.
Instead, make subtle adjustments to:
- Brightness
- Contrast
- Highlights
- Shadows
- Saturation
Natural editing often creates more timeless images.
12. Shoot in RAW When Available
Many premium smartphones support RAW photography.
RAW files preserve more image data, allowing greater flexibility when editing exposure, color, and detail.
This format is especially useful for photographers who edit their images afterward.
13. Use Night Mode Wisely
Night mode allows smartphones to capture brighter images in low light.
For the best results:
- Hold the phone as still as possible.
- Use a tripod if available.
- Avoid moving subjects.
Night mode works best for static scenes such as cityscapes or architecture.
14. Pay Attention to Backgrounds
A distracting background can ruin an otherwise great portrait.
Before taking a photo, look for:
- Clean backgrounds
- Leading lines
- Symmetry
- Color contrast
A simple background helps your subject stand out.
15. Edit Your Photos
Professional photographers rarely use images straight from the camera.
Basic editing can improve:
- Exposure
- White balance
- Sharpness
- Color balance
- Cropping
The goal is enhancement, not overprocessing.
Common Smartphone Photography Mistakes
Avoid these common errors:
- Using excessive digital zoom
- Shooting with a dirty lens
- Ignoring lighting
- Crooked horizons
- Overediting photos
- Cluttered compositions
- Holding the phone unstably
Correcting these habits can dramatically improve your photography.
Recommended Accessories
Helpful accessories include:
- Smartphone tripod
- Bluetooth remote shutter
- Portable LED light
- Clip-on lenses
- Microfiber cleaning cloth
While optional, these tools can expand your creative possibilities.
Best Subjects to Practice
Improve your skills by photographing:
- Landscapes
- Architecture
- Portraits
- Food
- Street scenes
- Pets
- Nature
- Sunsets
Regular practice builds confidence and develops your photographic eye.
Quick Smartphone Photography Checklist
Before pressing the shutter, ask yourself:
✔ Is the lens clean?
✔ Is the lighting good?
✔ Is the subject in focus?
✔ Is the composition balanced?
✔ Is the background free of distractions?
✔ Am I using the right lens?
✔ Is the phone stable?
✔ Do I need to adjust exposure?
Following this simple checklist can significantly improve your results.
Conclusion
Professional-looking smartphone photography is less about owning the most expensive device and more about understanding the fundamentals of photography. By mastering lighting, composition, focus, stability, and thoughtful editing, you can consistently capture images that look polished and visually compelling.
Modern smartphones provide incredible camera technology, but the photographer remains the most important part of the process. Practice regularly, experiment with different perspectives, and learn from each shot. With time and creativity, your smartphone can become a powerful tool for producing photos that stand out—whether you’re sharing them on social media, preserving memories, or pursuing photography as a serious passion.